New Garden Boxes

During the early part of April, we made some big changes to the garden. As some of you who read my blogs already know, I garden in garden boxes. We moved the boxes from up by the house to out by the greenhouse, yay!! It was a great decision to move them and to top it off we built some more boxes. It makes me so happy to have so much more space to grow stuff!!

Wanna know more about gardening in boxes? Just ask me, read my blog posts, keep checking for more posts to learn more as well

✌🏼❤️😁 Tasha

Pear Sauce!! 

For the past few years we have been going to a place not far from our house and picking pears from a really old pear tree. We used to just pick a few to eat on but I started feeling bad for this poor tree, producing all these wonderful pears but only a small amount were being enjoyed. So I decided to go pick a bunch and can sliced pears. But after I got them home and started to process them, I realized these were not going to slice up and can well. So I tried running them through the processor and making sauce. No sugar needed here, this stuff is delicious!!! It goes over better here than applesauce! To think that it all happened by accident too! Anyhow, here’s pictures from our annual pear picking day and pear sauce making!!! 

We just can’t get enough of this stuff around here. Want tips and instructions on how to make it? Just leave me a comment and let me know and I’ll post instructions. Until next time folks!! 

How to Can Okra

First let me say, I love okra!! I like it in stir fry, I like it breaded and deep fried but my favorite is fried okra and tomatoes. I usually just cut it up and put it in baggies and freeze it. This year I wanted to try canning it. I’m that girl, that girl that loves canning stuff! Here’s how I did it:

Things you need: 

Okra

Water

Sharp knife

Mason jars (I used wide mouth quart)

Large pot

Strainer 

Pressure canned

First wash okra and slice into bit size pieces. Then put in large pot and cover with water, bring to a boil and simmer for 2 minutes. 

Rinse and drain. Get pressure canner ready. Fill a smaller pan with water and bring to boil. While the pots heat, fill jars with okra leaving 1 inch head space. Then pour boiling water from smaller pan over okra leaving 1 inch head space. Place seal and ring on jars and process in your pressure canned for 25 minutes for pints and 40 minutes for quarts at 10 pounds pressure. 

Much better than taking up freezer space. Have you ever canned okra? I’d love to hear about it!! 

Lacto-Fermented Cherry Tomatoes

I had an over abundance of cherry tomatoes this year. As I wrote in my last blog, I was determined to can tomatoes in new ways. So I researched and researched ways to can cherry maters. I tried just canning them, which I wrote about in my previous post. When I saw about fermenting them I was very intrigued. Simple process and soooo good for you. Here’s what I did:

I used 2 wide mouth half pint jars. 

Two glass fermenting weights

4 cloves of garlic

6 basil leaves

2 oregano leaves

1/2 tsp celery seed

1/2 tsp whole peppercorns

1 tsp pickling spice

Coarse sea salt

Water

First put 2 cups water in a bowl and add 20 grams of the coarse sea salt. Stir to dissolve salt. Then fill your jars with cherry tomatoes leaving half inch head space. Add half of each the rest of the ingredients to each jar. Then pour the salt water brine into each jar, enough to cover the tomatoes. Then place a weight on top of each jar. Place in a dark area and cover with a tea towel and let sit for 3-5 days. Checking daily to make sure brine is covering the tomatoes. Then cover with lid and place in fridge for at least a week. I let mine go for 2 weeks in the fridge before tasting. Let me tell you, these are delicious!!! And they look gorgeous! In hindsight I could have put more cherry tomatoes in each jar. Other than that I wouldn’t change anything. These are so yummy! 

Have you ever fermented tomatoes? I’d love to hear about it! Please share in the comment section! 

Canning Tomatoes

Typically I’m that girl that cans tomato juice. Last year I canned some sauce. This year I was determined to can tomatoes in new ways. I canned a good amount of sauce and some cherry tomatoes. I just love canning!! ​

The cherry tomatoes canned well, they all split open but still look beautiful. I am not impressed with them overall, I had hoped it would be like having a cherry tomato off the plant but it’s nothing like that. They are soft and squishy and the skin got kind of tough. Won’t be doing that again. Honestly the cherry tomatoes are way better to throw in when I’m processing the others. I also fermented cherry tomatoes which are delicious. I’ll write about those in my next blog. 

New Tomato Cages! 

Every year now for as long as I have gardened, about 13 years now, I have fought with metal tomato cages. Flimsy little things that have never been able to handle the huge tomato plants I grow. So we searched for ideas and inspiration for something better. This is what we came up with. Nice sturdy cages that we can add to as the plants grow! They are working fabulously!! No more bracing off metal cages to still have them collapse under the weight of these massive plants!! Yay!! Happy gardening folks!! 

Homemade Chocolate Syrup

I’m that girl that LOVES chocolate milk! A glass before bed or even in the middle of the afternoon! I don’t eat breakfast it upsets my stomach to eat before like 10am, so I drink a big glass of chocolate milk. It fills me up and tastes great!! My kids have followed in my footsteps and also enjoy a glass with me every morning. Last night I realized we were almost out….. So I thought why run out to the store just for chocolate syrup? I’ll make some!! Here it is in all its deliciousness!!!!  

 It was so quick and simple and the house smelled amazing while I was making it!! I don’t know why I wasn’t doing this before!! You can bet I won’t be buying it anymore from the store!!! Here’s my recipe:


 The kids and I think it’s better than store bought, which is saying something, I’ve sworn by my Hershey’s for years now!!  

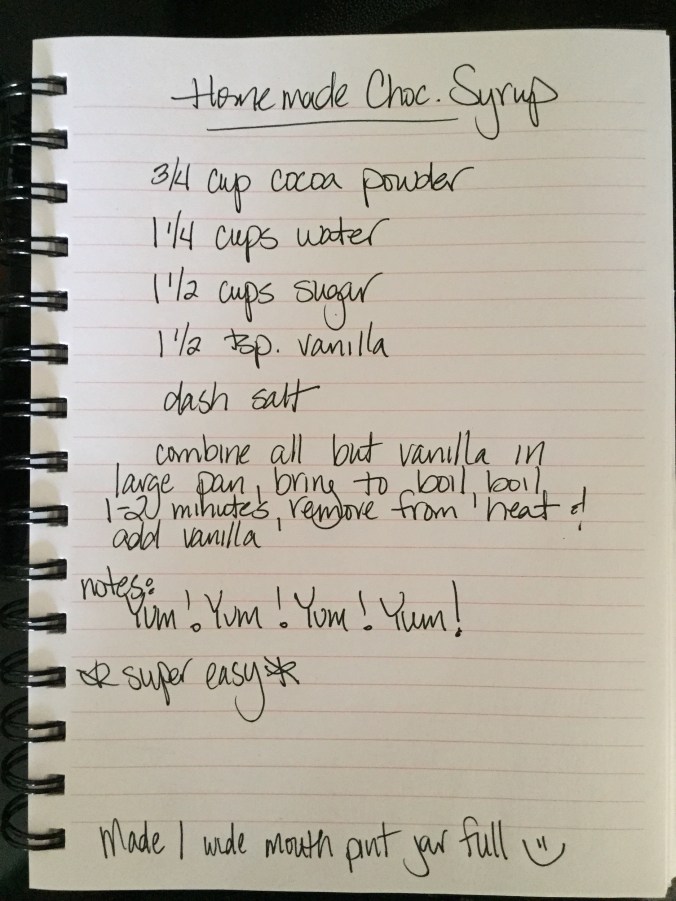
 Have you ever made chocolate syrup? Please share your comments! 

Happy making stuff people!! 


Homemade Pancake Syrup! 

My egg stock is quite full. Yay!! So tonight I wanted to fix French toast, we do a lot of breakfast for supper since we don’t eat breakfast, but, I didn’t have any syrup….. I have watched my grandma make syrup tons of times and ate it with her many times, I for some reason have never made it myself. We all know I’m that girl that likes to make anything she can so I decided tonight I was making syrup!!! Yippie! After looking through a few handfuls of recipes I made my decision and gave it a shot! 

In a medium size saucepan I put:

1 cup packed dark brown sugar

1 1/2 white sugar

1cup water

1/2 tsp.  moms homemade vanilla 


& 2 cups light Karo syrup

I warmed it at a medium temperature and stirred it until it all melted together and was smooth, about 12 minutes. Then I let it cool while I made French toast and chewy bacon. I poured it in a wine bottle I had lying around waiting to be reused for something and served! Yummy! The kids and husband all approved! 


It was so easy and fun to make! I don’t know why it took me so long to try it!!! 

Have you ever had or made homemade syrup? Did you like it? How did you make it? Would you do anything different? I wana hear all about it! Leave me a comment! 

Thanks and happy cooking! 


Homemade Ketchup

I have been so into making anything and everything I can. Today I decided to tackle homemade ketchup! I have wanted to do it for a while now and we were finally out of store bought. What a better time?!?! If you follow my blog you already know I make my own tomato powder and onion powder from tomatoes and onions I grow. I also make my own garlic powder from locally grown garlic. So of course that’s what I used to make my ketchup!! Yumm right?!?! 


Here’s the recipe I used- (though I wana change a few things next time) 

12 oz. tomato paste (which I made from my tomato powder 12Tb powder & 6Tb water) 


1/2 c. Honey

1 c. Vinegar 

1/2 c. Water (a lil more or less depending how thick you want it) 

2 tsp. salt

1/2 tsp. onion powder

1/4 tsp. garlic powder 

Combine in a saucepan and bring to a boil, then reduce heat and simmer 20 minutes. (I used my immersable wand blender thing to smooth it out, homemade onion n garlic powder can be kinda chunky)  Store in the fridge and enjoy! That’s its! It is that easy!! 

Made about 2 1/2 – 3 cups


Look gorgeous doesn’t it?? 

Have you ever had or made your own ketchup?? I’d love to hear about it!!! 


Growing a Pineapple from a Pineapple

I’m that girl that’ll try most anything once! You say it can be done, I want to try it! About three days ago mom gave me the top off her pineapple, so I’m going to try to grow a pineapple from a pineapple!!! I got on Pinterest, we all know I LOVE Pinterest, and did some research. They say to put the top upside down for a week and let it dry out. So here it is just hangin out upside down waiting and drying. 

 In a few days I’ll put it in water and try to get it to grow roots!! Have you ever grown a pineapple? I would love to hear about your experience!!  Thanks everyone and happy growing ✌️❤️😃🍍